Domain configuration is broken up into two main sections. See below for details on each section.
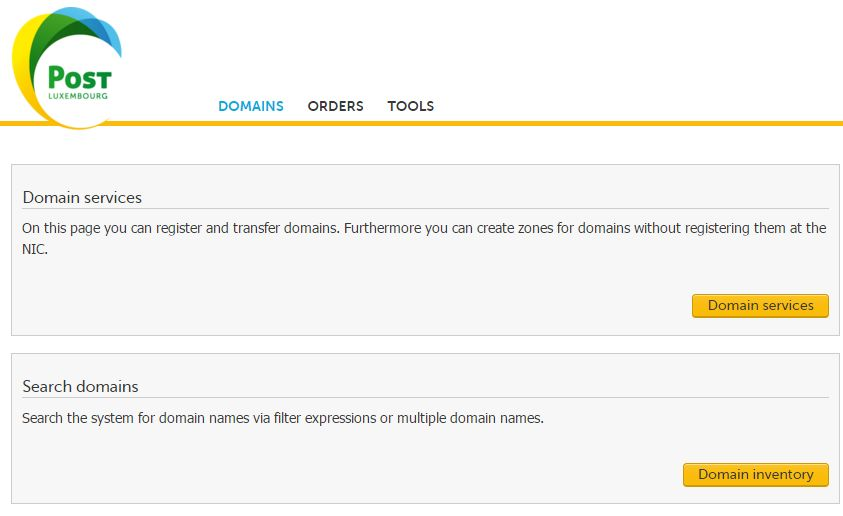
- Allows you to register a new domain
- Allows you to transfer in domains from another vendor.
- Allows you to create a zone for a domain held with another vendor
DOMAIN INVENTORY
- View existing domains
- View historical changes made to your domain
- Modify domain contacts
- Change DNS records
- Terminate Domains
- Do a Whois check on your Domain
Domain Services
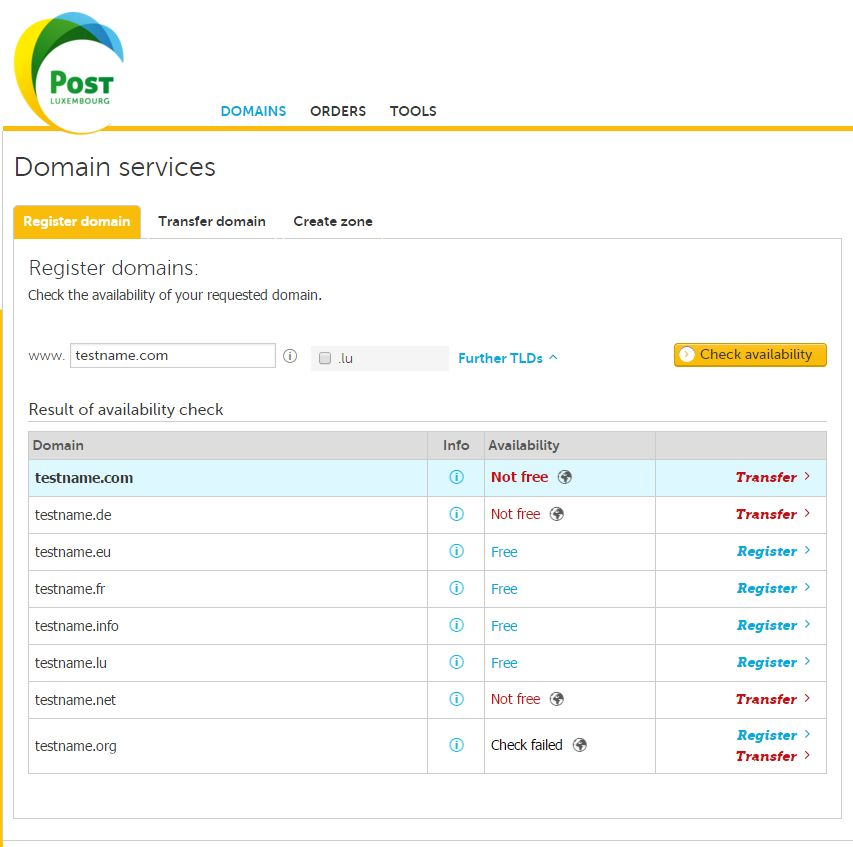
Register a new domain.
- There are four steps involved in registering a new domain name.
Step 01
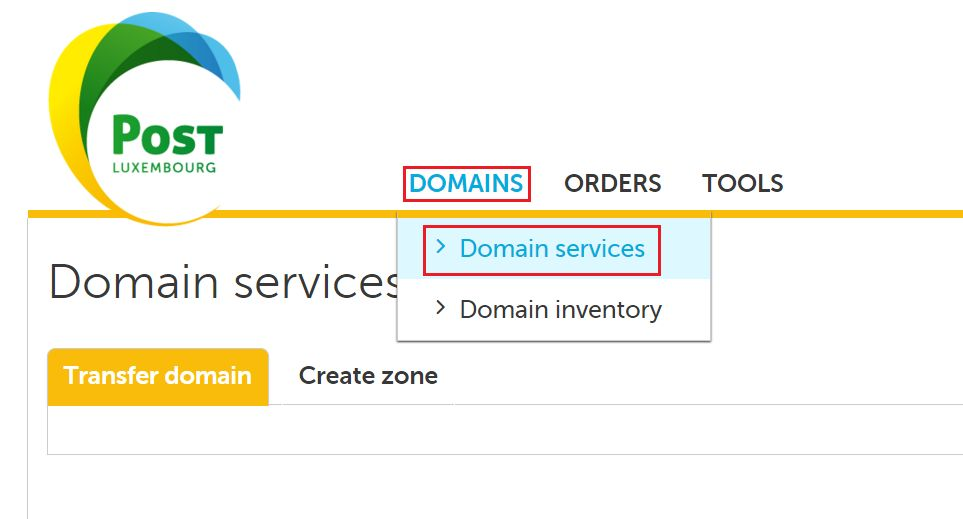
- Click on Domains
- Click on Domain Services
- Click on Register domain tab
- Enter your domain name to register
- Click on Check availability
- (optional) select your favorite TLD(s)
- If the domain name is free – Click on Register
- Leave the Accounting period to ‘One year’ (renewal will de done automatically)
- Click on Go to step 2

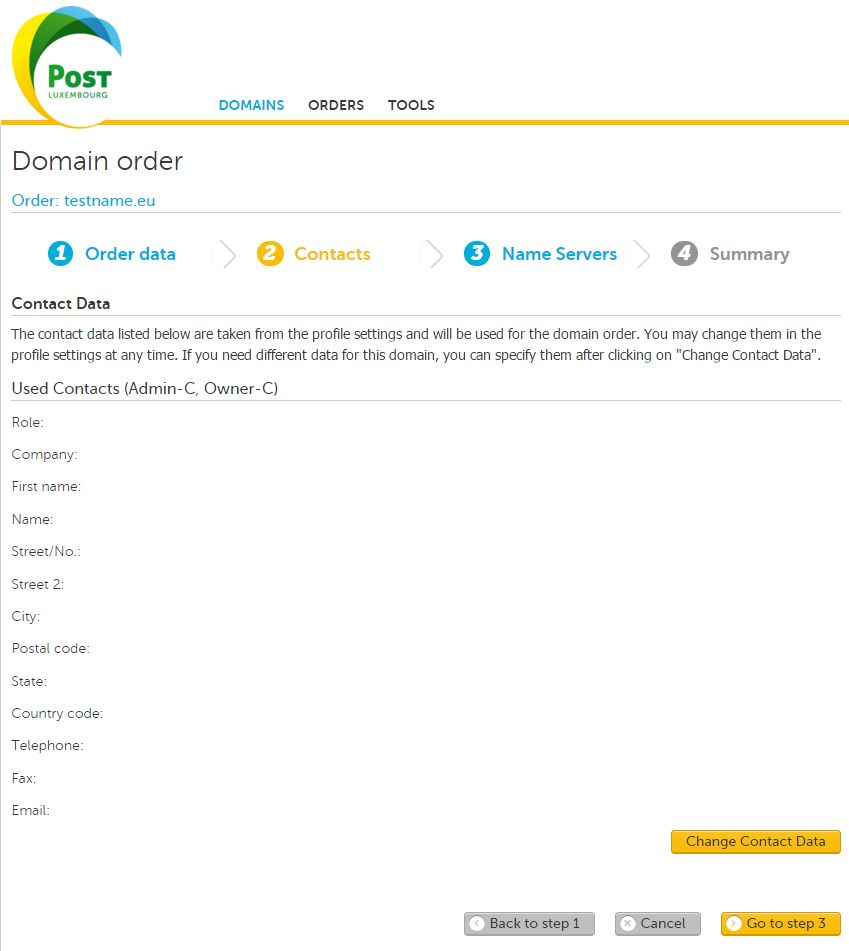
Step 02
- Configure the Contact Details
- Click on Go to step 3
Step 03
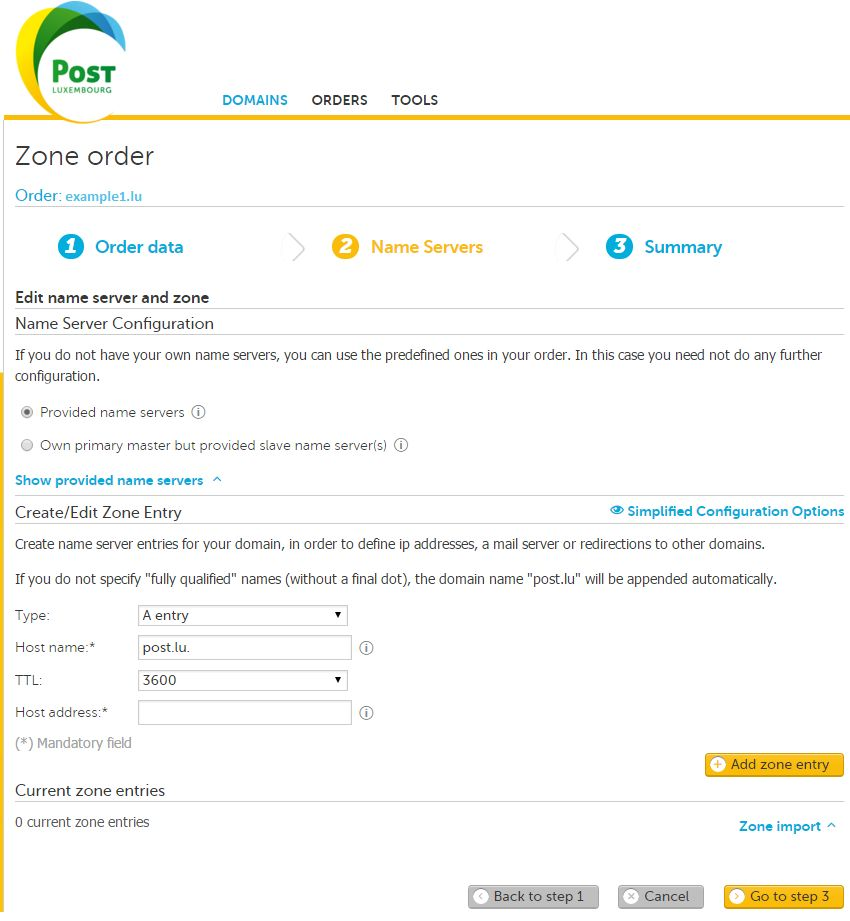
- Set the Name Server Options
- Click on Extended Configuration Options and add Zone entries as needed
- Click on Add zone entry for each additional zone entry you require
- Click on Go to step 4

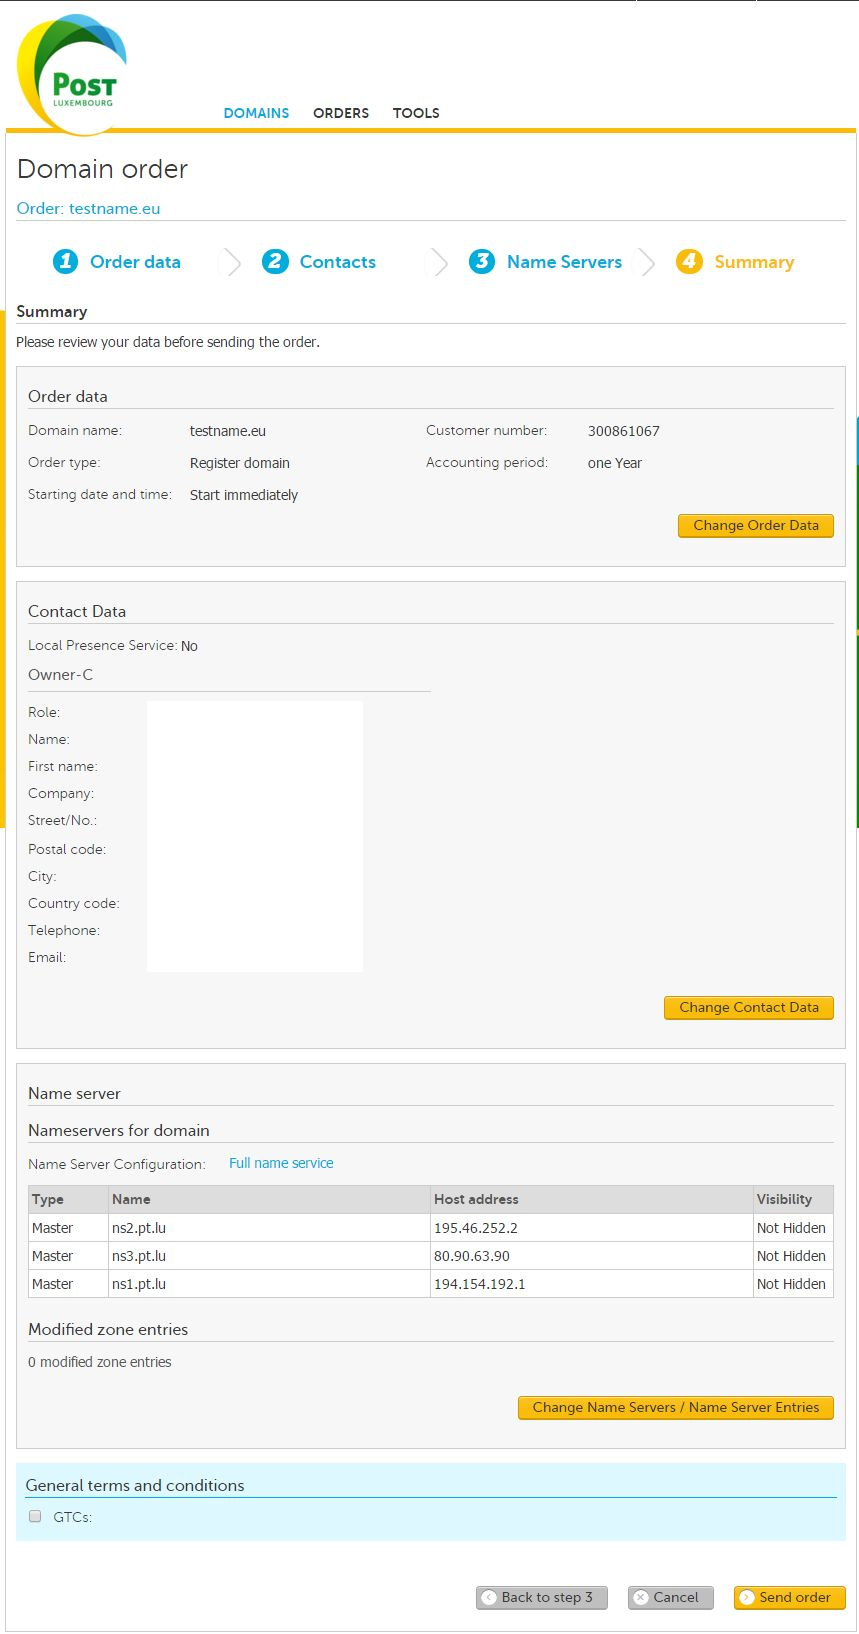
Step 04
- Review order to make sure there are no mistakes
- Modify any necessary changes
- Click Send order
Transfer a domain from another vendor.
- There are four steps involved in transferring a domain.
Step 01
- Click on Domains
- Click on Domain Services
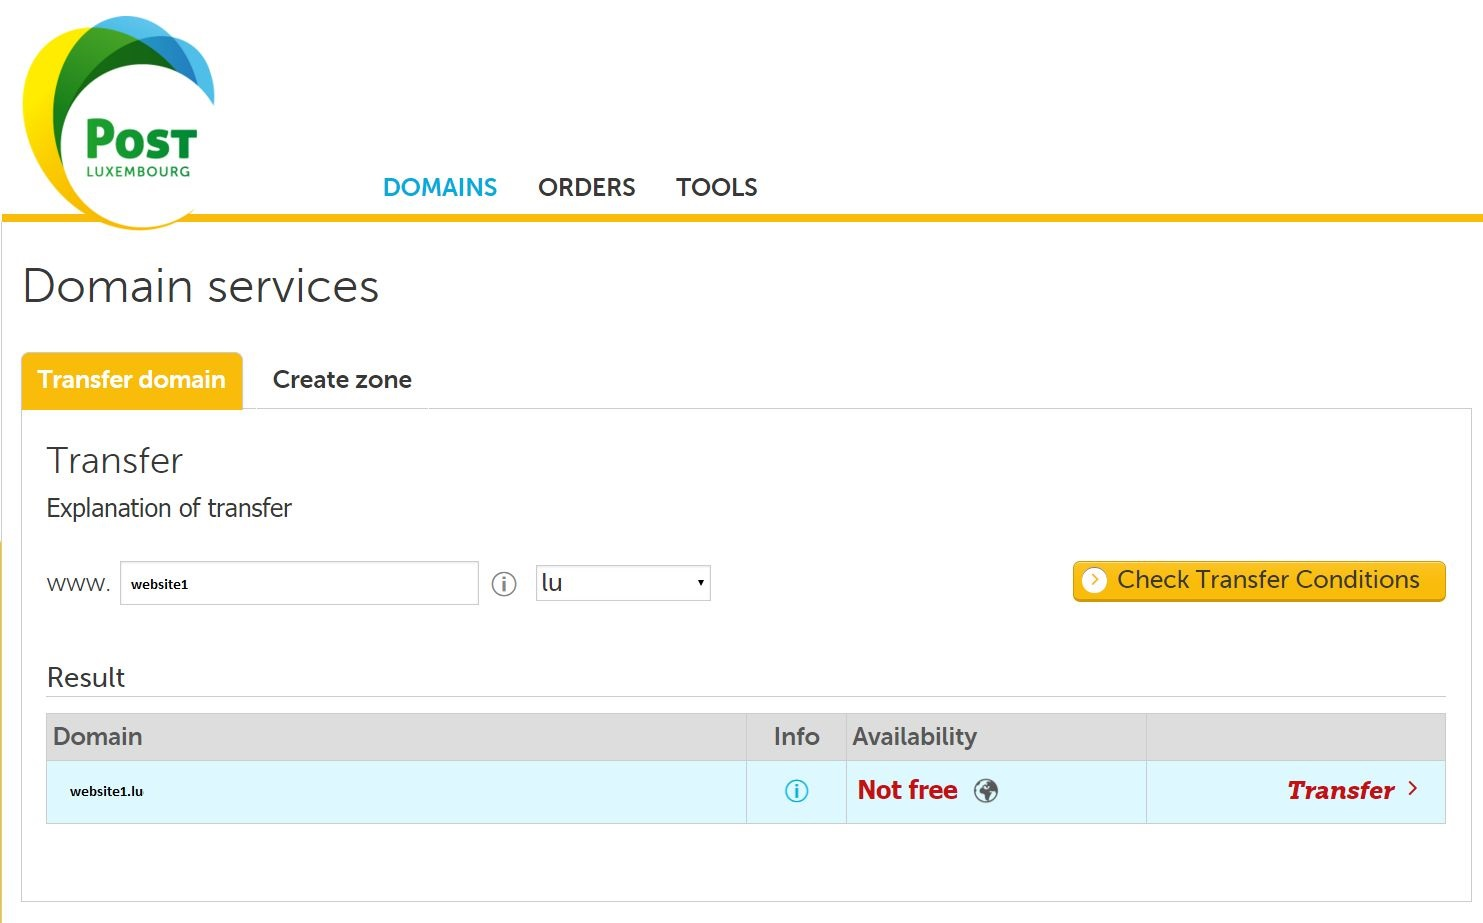
- Click on Transfer domain tab
Enter the domain you wish to transfer
- Click on “Check Transfer Conditions” | if the domain is registered it will allow you to proceed to the next step.
- Click on Transfer
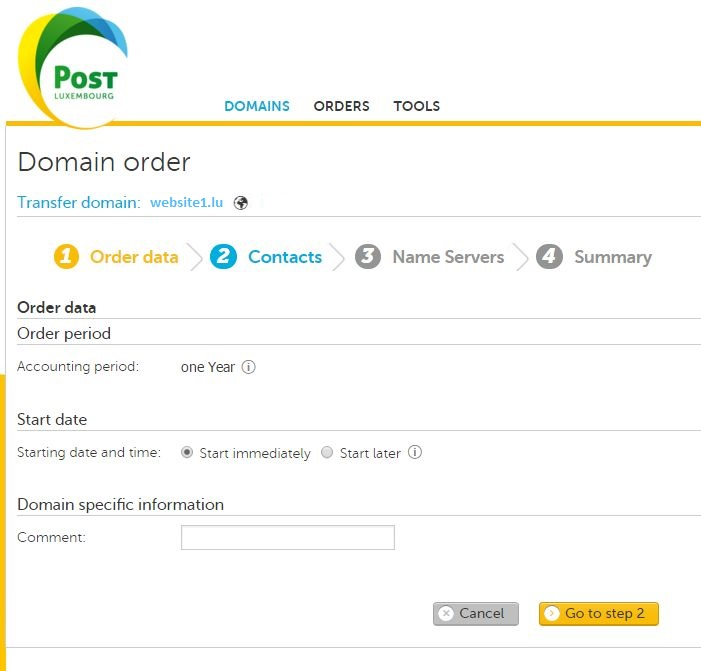
- Set the start date of when you would like the transfer order to take place
- Add any relevant comments you have
- Click on Go to step 2
Step 02
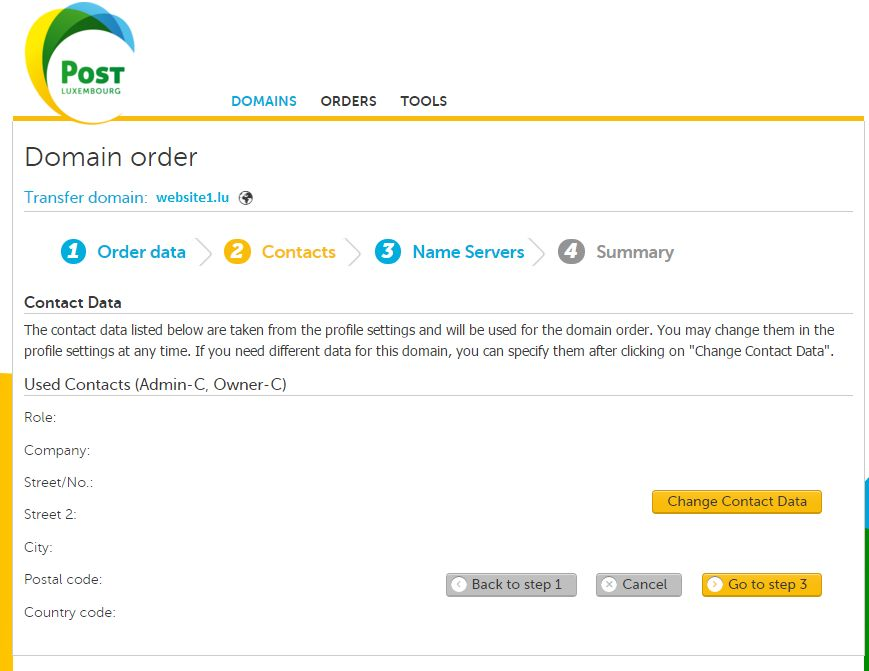
- If you have configured your contact detail in “Contacts” then the Contact Data will automatically be filled in.
- Otherwise you can enter the data manually
- Once you have entered the data, click on Go to step 3 to proceed
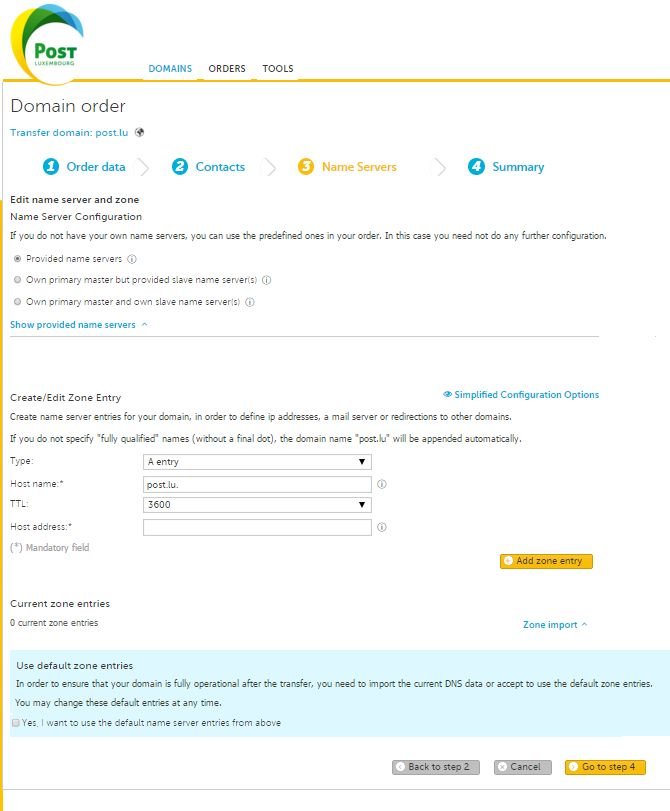
Step 03
- Fill in Name Server data
- Click on Advanced Configuration Options
- Add as many entries as needed completing each one by clicking the Add zone entry button
- Click on Go to step 4
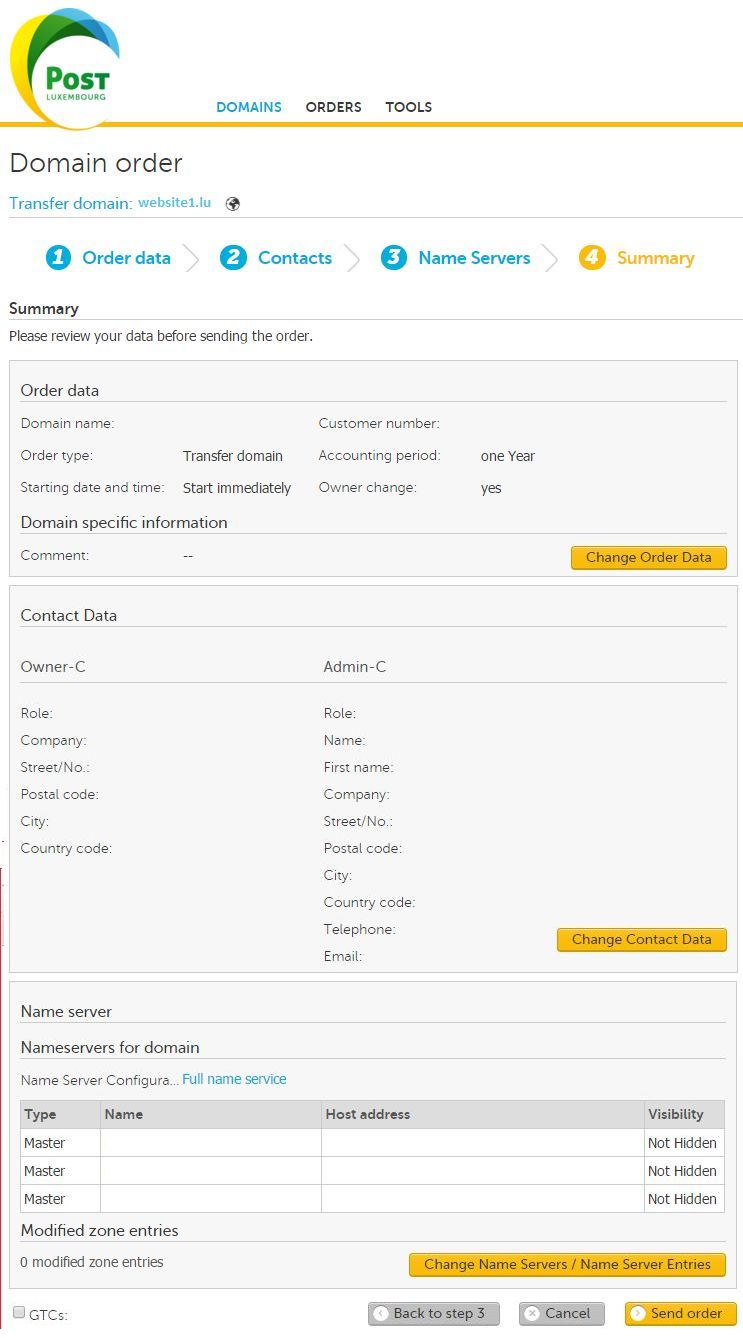
Step 04
- Review all the content and Send order
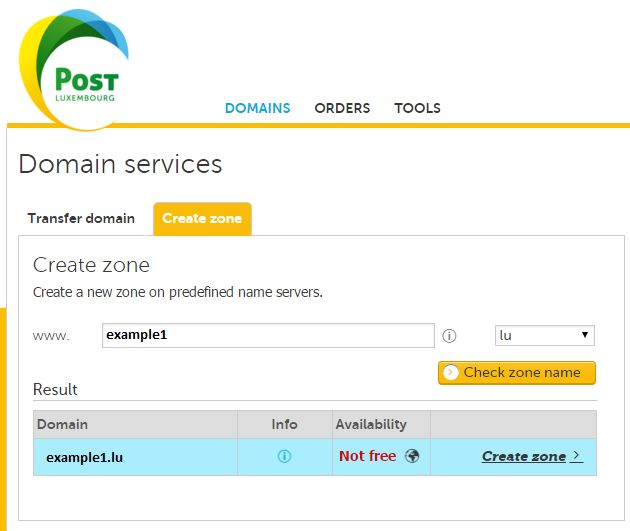
Create a zone
This allows you to host a zone file with Post for a domain you have registered with another vendor.
- There are four steps involved in transferring a domain.
Step 01
- Click on Domains
- Click on Domain Services
- Click on Transfer domain tab
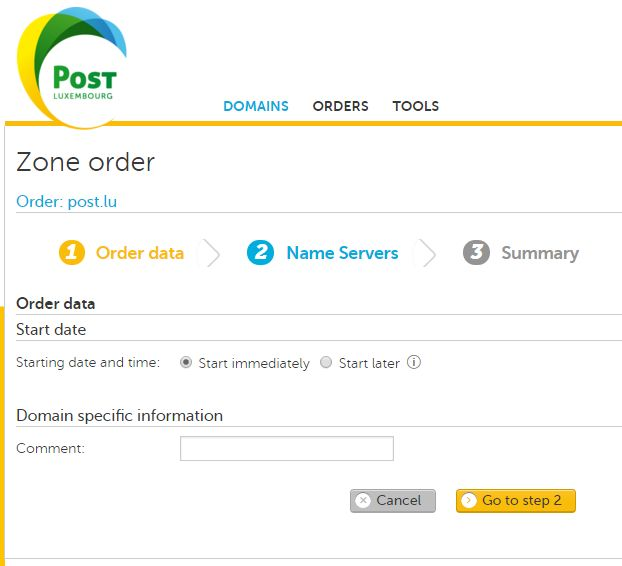
- Enter the date and time you wish the transfer to take place
- Enter any comments relevant to the transfer
- Click on Go to step 2
Step 02
- Add Name server data
- Click on Advanced Configuration Options
- Add as many entries as needed completing each one by clicking the Add zone entry button
- One all entries are completed click on Go to step 3
Step 03
- Review all the data to ensure its correct and then click Send Order

Domain Inventory
Domain Inventory is used to manage your existing domains. It will display all the domains you have registered with Post. It will also allow you to modify these domains.
Domain Inventory
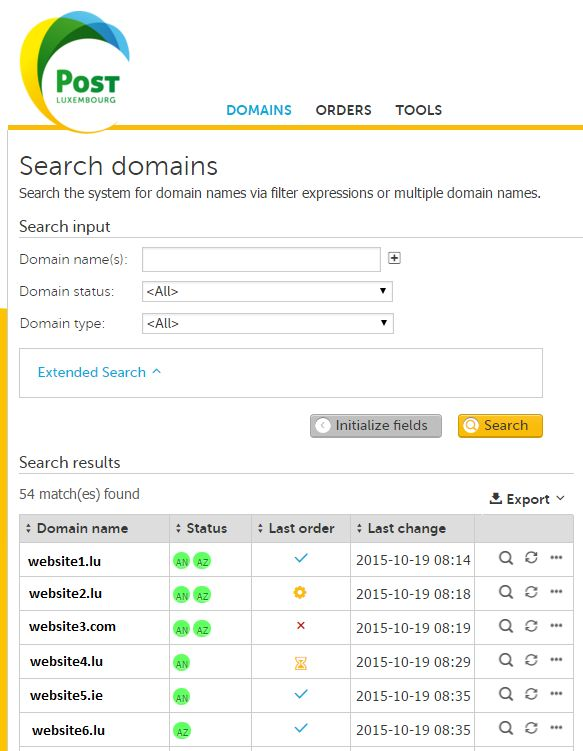
- Click on Domains ➔ Domain Inventory
- This shows all the domains registered with Post.
- From here you can view DNS records and modify different aspects of your domain.
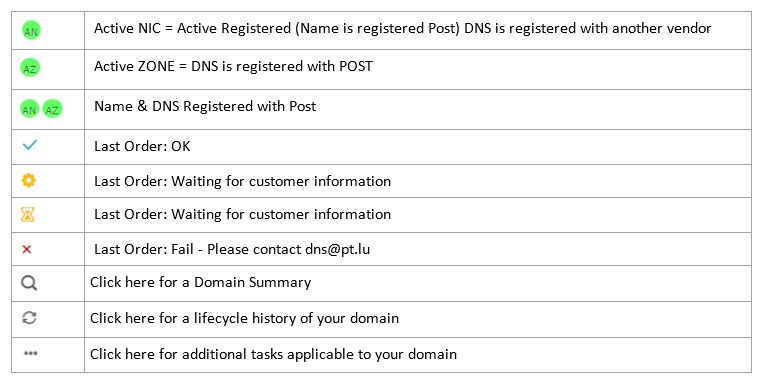
Symbols Explained
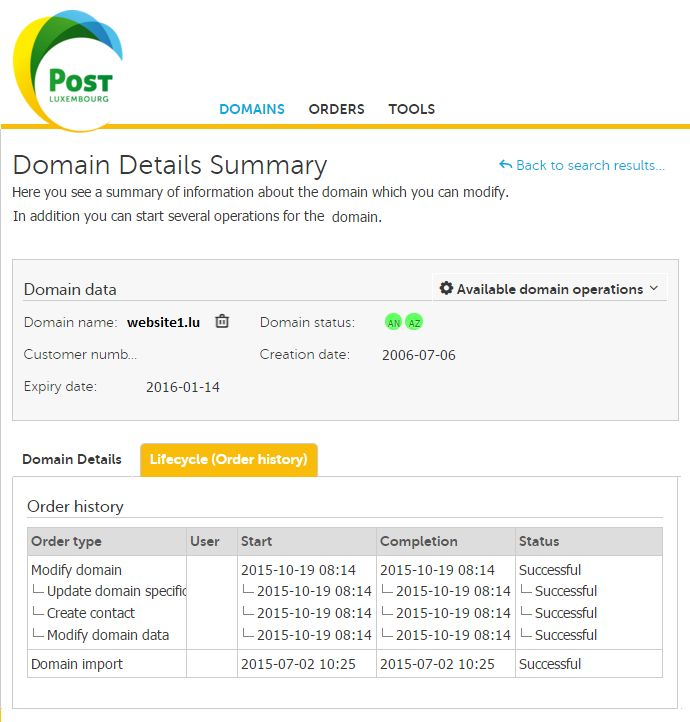
Domain Summary
- Click on a Domain to see more information about your domain
- Expand the General Data, Domain Contacts & Name Servers and Zone tabs to display all the Domain information.
- General Data: This is for customer specific comments – Does not affect the operation of the domain
- Domain Contacts: This displays the Owner contact details
- Name Server and Zone: This display the name server configuration
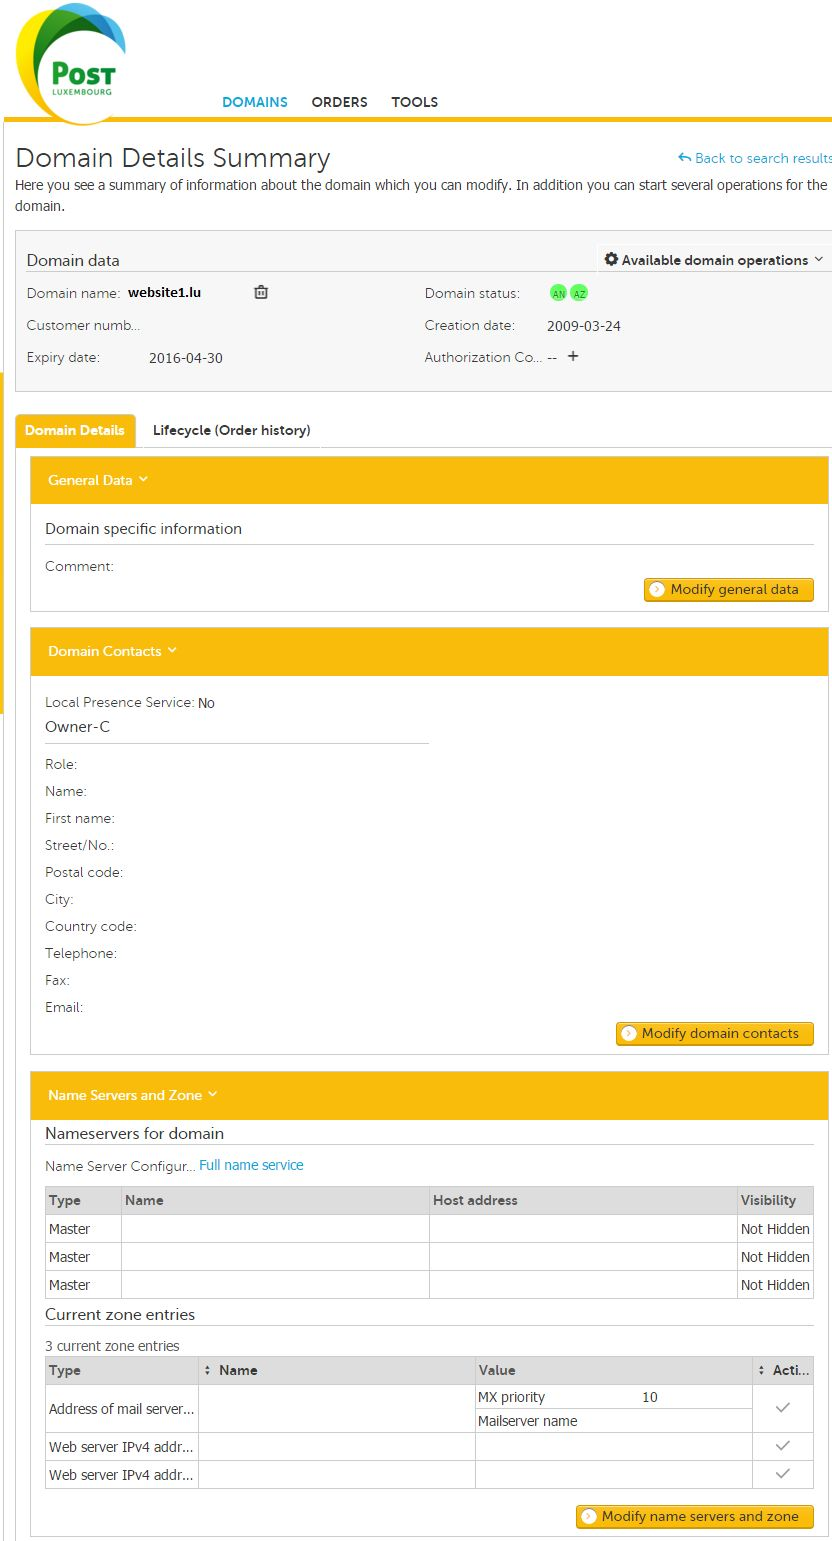
Lifecycle
- Displays all previous changes made to your domain along with the status of those changes
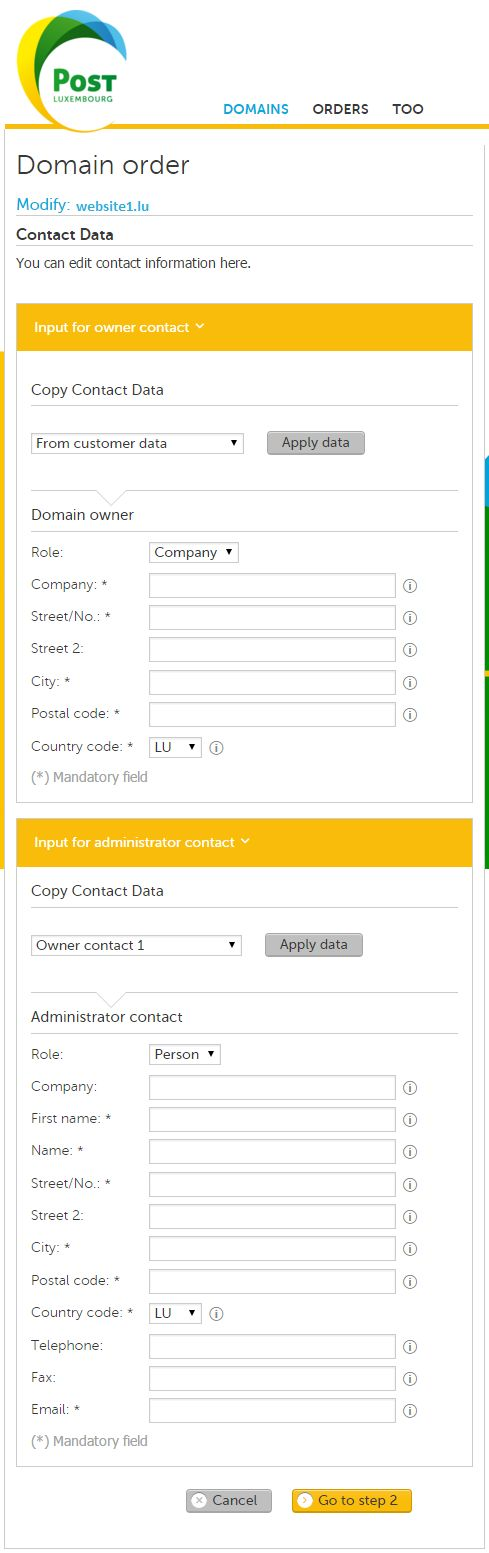
Modify Domain Contacts
- Click on modify Domain Contacts (can be found in Domain Summary)
- If you have configured your login contact if will automatically populate with this data otherwise enter it manually
- Alternatively you can auto fill the contact details with other preconfigured contacts
- Once you have entered the contact details click on Go to step 2
Review Contact data and Send order
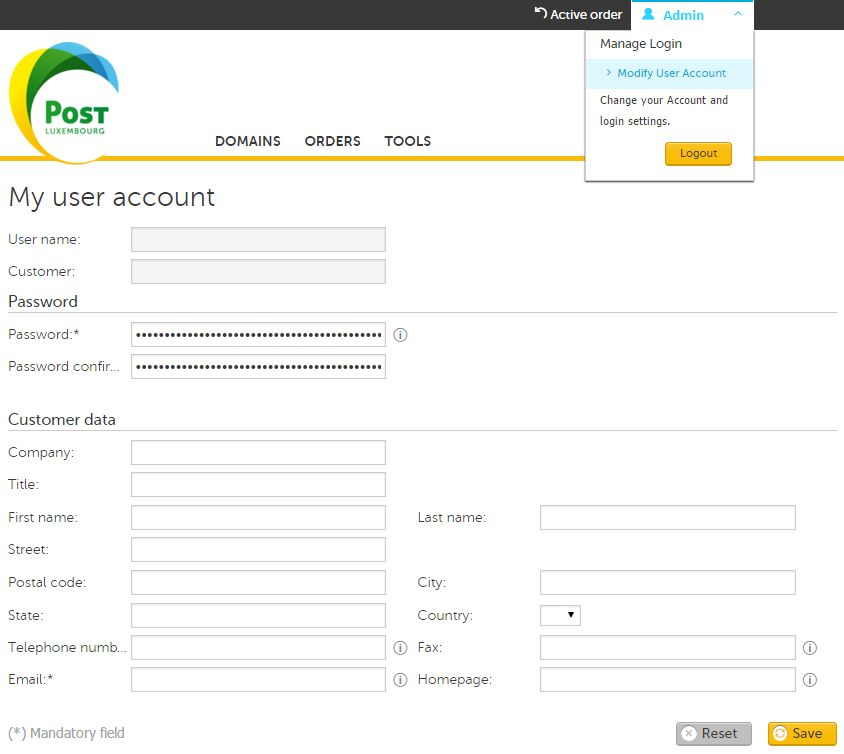
Modify Customer Details
- This is useful for autofilling contact details in Domains
- Click on Admin ➔ Manage Login ➔ Modify User Account
- Enter your details
- Click Save

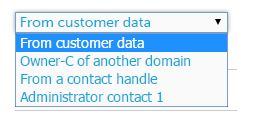
Preconfigured Contacts
In the dropdown you are presented with four options for auto filling the contact details.
- From customer data: This is the default it will take your login data
- Owner-C of another domain: This will pull the contact details from another domain with an identical tld.
- From a contact handle: DO NOT USE THIS OPTION
- Administrator contact 1: If the admin contact for your account is well configured you can use this.
- Otherwise you can enter the details manually
Modify Name Servers and Zone
- Click on Modify Name Servers and zone (can be found in Domain Summary)
- Click on Extended Configuration Options
- Add as many entries as needed, completing each one by clicking the Add zone entry button
- You can also modify, copy and delete existing entries
- Once modifications are complete click on Go to step 2

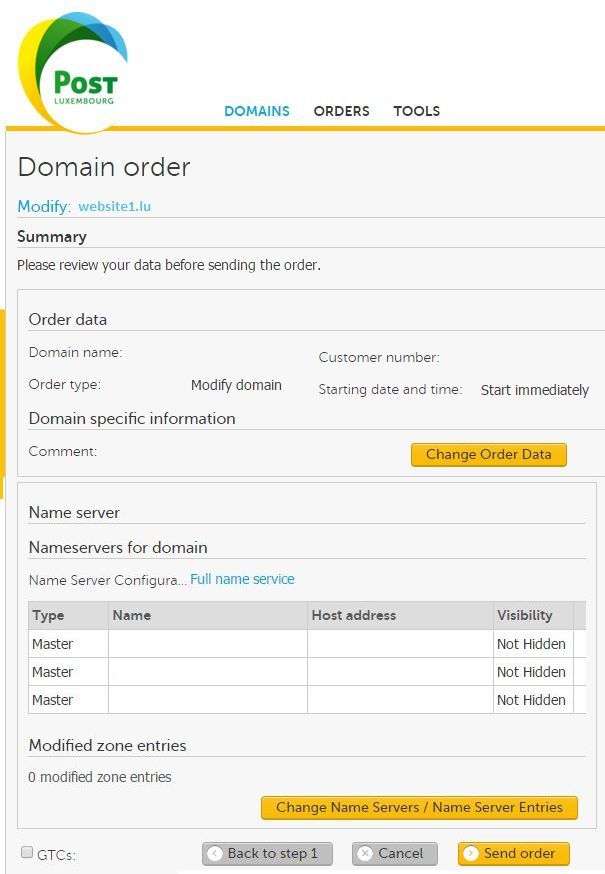
Review changes and send order
- Review your DNS changes and once satisfied they are correct click on Send order.
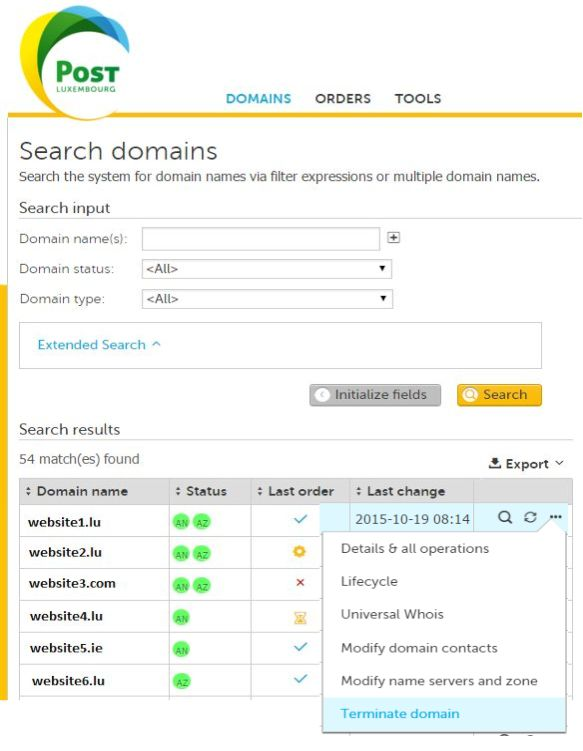
Terminate Domain
- Please use extreme caution with this option. If you terminate a domain you will need to re-register it should you require it back.
- THIS WILL RESULT IN DOWNTIME FOR YOUR WEBSITE
- Click on dropdown menu for the domain you wish to terminate.
- Click on Terminate domain
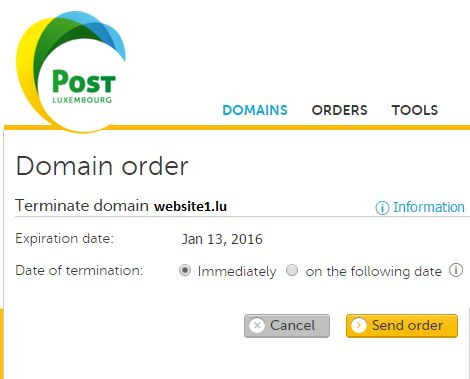
Terminate Domain Step 2
- If you wish to proceed with the Domain Terminating, set the date of termination and click Send order.
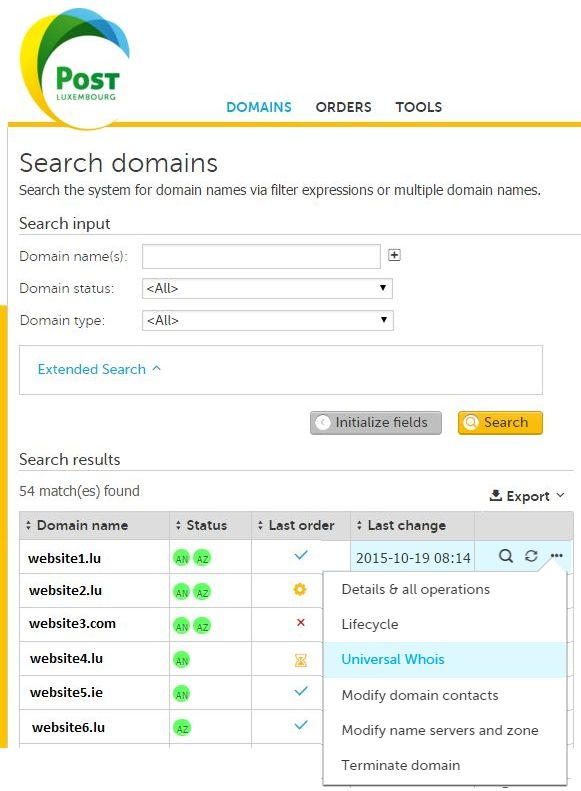
Universal Whois
- Whois allows you to check the configuration of your domain. It is a query and response protocol that is used for querying the database that stores the registered users or assigne of an Internet resource, such as a domain name, an IP address block, or an autonomous system.
- Click on the dropdown menu for the domain you wish to check
- Click on Universal Whois
Whois Results
- After clicking on Universal Whois a popup will display all the current data about your domain.
